Making 3D 🗿 for the Web
In 2018, 3D in a website is trendy. However, UX and performance are also top priorities of the moment. Our goal: create great experiences for users through fluidity, immersion and innovation. Sounds like a lot of pressure 😅.
More and more design studies include motion design and 3D modeling courses. It’s time to mix those skills with web design and reach the possibility to tell developers: yes I know you can code it! (not an exact science 😉).
3D is now accessible in the browser without any plugin thanks to WebGL for example. It implies a new dimension (Z), new ways to interact (with keyboard, mouse, gestures) and many animation possibilities (2D or 3D).
When you search the web to find WebGL tips, it mostly refers to code. Nevertheless, an optimized design and a better comprehension of what will be done with it should not be discarded. Having a 1024*1024px size for a little icon displayed on a tiny screen sounds silly in two dimensions (well, I hope so). In 3D, we’ll deal with a lot of images, coordinates and animations.
Section intitulée new-type-of-sketches📐 – New type of sketches
Designing a website does not only imply Illustrator, Sketch or Photoshop anymore. Blender, Cinema4D, Maya or other CAD softwares are also needed to create models. To go further, there are also softwares like Houdini or Substance painter.
In a 3D project we need to set camera movements, lights, objects displacements or reflections. Those elements can be coded from scratch or modelized in 3D files and re-use in the development. There are many similarities with game design. With the rising of augmented/virtual reality, 3D skills are becoming a great asset for a web designer.
Sketches needed are different than in a 2D context. Video formats are a good way to explicit animations accompanied by several image exports of the final scene (all the elements in a hierarchical order), not only through one camera point of view. Explanations about how the design has been made in the software can be useful because there are similarities with the way it can be coded.
As those kind of projects grow in numbers and quality, agencies release case studies about them. Here are some examples :
- Oat the Goat
- Ouigo let’s play
- Hogwarts experiment
- Christmas Experiment from @mad_clem
- Ghost recon – behind the scenes
It presents good workflows for an effective production process. We can point out the importance of testing and prototyping. Interaction within the website through debug mode (global view and helpers) and controller library (like dat.gui, three.js inspector) are helpful.
Keep in mind that a lot can be exported from the design. As you can take size and block ratios from a Photoshop file, you can export a spline from a Blender file. It will represent the camera movement’s path, an array of coordinates for the camera to follow.
This spline editor helps making and exporting one. Lights positions can work the same way.
Section intitulée 3d-models-jungle-of-possibilities🐒 – 3D Models, jungle of possibilities
As we saw, modelized objects are a big part of the design. They can be created from many software, each one has pros and cons. Blender seems one of the most web creation friendly and open source. In a Production process, choosing the software we’re most comfortable with seems wise.
In general, a 3D object is composed of a geometry (his shape), material(s) and textures. A material defines the optical properties of an object: its color and whether it is dull or shiny. A texture is a pattern that breaks up the uniform appearance of the material. Most of the time, images are used to represent those textures.
Following the number of 3D softwares on the market, there are plenty of export types for an object (proprietary formats or open ones). JSON, OBJ, DAE, FBX… Hard to know which one is “the best”. The advantage is that it is quite easy to find a translator from a format to another. The three.js library loaders are a good preview of the different formats and their application.
To experiment or gain time, using models already done is possible. Recently Google launched a 3D models library named Poly were some of the items are free to use. Sketchfab is another well-known library for 3D model inspiration.
There are possibilities to test models import with websites such as threejs editor ( file > import ) – loading times are printed in the console (cmd+option+I for Chrome) to compare between types – or gltf viewer.
Section intitulée performance-responsibility🚄 – Performance responsibility
When you render a single shot or an animation in a software, it usually takes some time. Here, we are talking about real-time rendering! We cannot wait between frames even if the graphic processor make really fast calculations.
When creating an object, it’s important to anticipate its definition. Why making details for something that will not be closely seen? Every vertices that will not be loaded make the result faster. The definition of an object depends on the distance between the camera and him. When it is really far, it can be as simple as a plane.

Even if the mesh is quite simple in its geometry, textures are a good trick to simulate a better definition. They are applied on the mesh to do all sorts of things, reflection, colors, metalness, shadows…

Uv mapping is used to determine how to apply a texture on a mesh. It’s a set of coordinates associated to each vertex that will guide the texture application. To set them, we unwrap the UVs. It can be done in a 3D software. As a result, we obtain a correspondence between each vertex and a 2D plane.

This plane will be the base for the application of image textures (mapping). They can be smaller or bigger as long as they keep the same ratio. We don’t need a 4K definition for something small.
We can map images to add effects such as :

Normal maps are a good trick to simulate details on an object surface. Playing with the light, it creates a false 3D impression on a completely flat geometry.

To create all those maps every software shares a lot of tutorials. Substance painter has a great workflow to create and export them. The settings depend of the future development. Every material type can be linked with specific textures. Some can have a specular or an emissive map whereas others will have a roughness and a metalness map.
Other maps can be used for the environment, shadows or lights.


Sometimes, they need to be calculated dynamically, but it means that it will be heavier for the computer. And in other cases they can be static and the result will be just as fine. Environment maps add a great realistic effect to every creation.
Section intitulée case-study-gltf-formatCase study – GLTF format
Recently, I’ve been playing a lot with the GLTF format. It is fast, uses binary assets, open source and a lot can be done on the design side!
Here is a quick workflow to produce a full GLTF scene with Blender and display it on a web page with the three.js library.
1 – Create the geometry (as a Photoshop file, be nice with layer names)

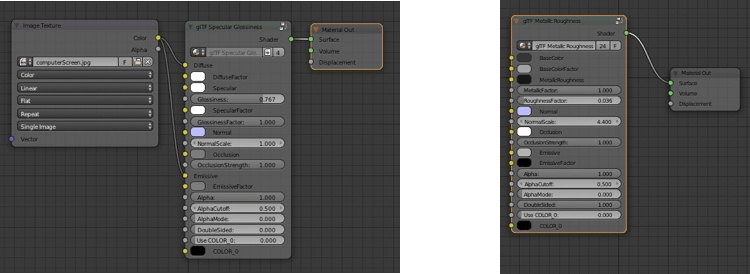
2 – Create the materials using the physically based rendering (pbr-nodes). They represent complex node groups for Blender that you can easily configure. They are not Blender native but they can be import or append in the Blender project from the Blender Exporter file (GitHub Repository). They can be found in the /pbr-node/glTF2_Principled.blend file.
3 – Create textures if needed. Here is a complete guide of how PBR works.
4 – Export everything with the Khronos GLTF 2.0 addon in .gltf if you want the developer to be able to inspect glTF structure or .glb for deployment.

5 – [code part 👩💻] Load the file into the three.js scene. The only texture that need to be added afterward is the environment map (what the object is reflecting):
loader.load('./assets/objects/monficher.glb', gltf => {
      let object = gltf.scene;
let envMap = new THREE.CubeTextureLoader().load(urls);
 envMap.mapping = THREE.CubeReflectionMapping;
 envMap.format = THREE.RGBFormat;
      object.traverse(node => {
        if (node == THREE.Mesh) {
          node.material.envMap = envMap;
          node.material.needsUpdate = true;
        }  });

 this.scene.add(object);
});
Section intitulée inspiration-time👩🎨 – Inspiration time
3D in web is not an experimentation anymore. Great works are coming out every month. It means that more and more ways to find inspirations are disponibles along with beautiful realisations. Codrops has been recently publishing some examples.
WebGL also helps creating 2D effects, such as image distortion, fluid. Used on a landing page they can be really immersive for the user especially if they are interactive.
Nothing is completely normalized in terms of softwares or formats and a lot can be done by many different ways. However we can see some specifications shine through the dark. It’s good to experiment a bit of everything because in the end you can guess a global workflow between all those possibilities. Indeed, maths are the same between those visual effects.
And you, what are your best protips when it comes to 3D design for the web?
Commentaires et discussions
Nos articles sur le même sujet
WebGL, the wow effect
Today our goal is to develop Immersive apps and experiments 🏆 Storytelling, UX, UI, animations and, above all, interactions are the main ingredients. Web APIs and JavaScript are very useful to build those. It…
par Cécile Delmon